There's a reason that #food is one of the most popular hashtags on Instagram. People love to scroll through pictures of drunken noodles, juicy cheeseburgers, rainbow-colored salads — you name it. And that's exactly why every restaurant can benefit from offering menu photos — because a picture can communicate the deliciousness of a dish in a way that a description just can't. Some restaurants are even getting in on the trend by decorating their walls with huge photos of their top dishes to appeal to their customers.
It's important for every restaurant to invest in a gorgeous set of menu photos. Properly executed, good menu photography will pique diners' interest in dishes they've never tried before, entice them to come back, and drive more sales. In fact, DoorDash data from a study of over 15,000 local small business merchants in Q2 2022 indicates that menus with item photos get up to 44% more monthly sales.
Ready to capture photos that drive orders? Here are six tips to make your restaurant menu photos stand out.
Tip 1: Pay attention to lighting
Successful menu photos rely on good lighting to set the right tone and atmosphere for your restaurant. If your photo is too dark or too bright, it can hide the details of your food. Aim for an exposure that is right in the middle, showing details of the image in both the highlights and the shadows.
Food looks best in natural light. This is because indoor lighting can cast colors and hues that make food look less appetizing. To take advantage of the best lighting conditions, schedule your restaurant photoshoot for either morning or late afternoon, when the daylight is diffused and won't cast harsh glares or dark shadows on your food. Setting up near a window will bring in a good amount of indirect light.
If you must use artificial lighting, limit yourself to one light — either placed overhead or to the side. Avoid standing in front of your light source or you may end up casting your own shadow on the photo.
Tip 2: Arrange artfully
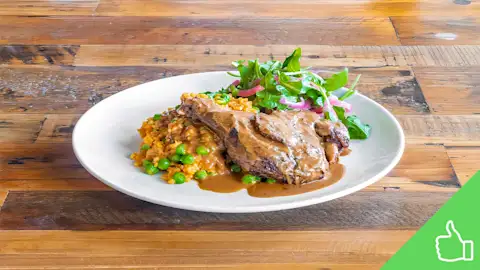
Pay close attention to the presentation of each plate. A dish of food looks most appetizing when artfully arranged, not just scooped onto the plate in one messy pile. Place your food carefully so it looks neat and visually appealing.
Monochromatic dishes, such as soups, can benefit from a few splashes of color or sprigs of garnish. Pretty bowls and plates can also add a nice aesthetic, as well as table linens and other props such as fresh flowers. Think minimalist, though. A simple background in a neutral color that is free of distractions is best for showcasing your offerings. You want to focus the viewer's attention on the food itself, not on the polka-dotted tablecloth or the crowd seated at the bar.
Tip 3: Create a pleasing composition
Many photographers swear by the rule of thirds in composition, dividing an image into three parts both vertically and horizontally, and placing key elements of the image along lines at their intersection points, off to the side of the center. Following the rule of thirds will result in an image that is pleasing to the eye.
Another strategy for good composition is to play with angles and framing to add visual interest to your restaurant menu pics. Overhead and straight-on angles usually highlight restaurant dishes best. If you want to emphasize the height of a particular dish (like a heaping pile of mashed potatoes), try a straight-on shot. A perfectly composed salad in a rainbow of colors, on the other hand, may look most appealing when taken from overhead in a bird's eye view.
Mix and match various styles for visual appeal. Whatever you do, keep the food as the primary focus of the photo.
Tip 4: Stay authentic
A great photo can capture the essence of a particular dish. Make sure that your menu photos accurately reflect your restaurant's meals as they are served — especially regarding preparation, portion sizes, and accompanying side dishes. If your famous fried chicken comes with mixed greens and coleslaw on the side, don't show a Cajun blackened chicken breast with a side of macaroni and cheese.
Menu photos help set customer expectations, so accuracy is important. In addition to showing the meal as it is served, your photo should also show as much of the entire dish as possible, rather than zooming in on a detail. This helps customers get an idea of the meal's actual portion size.
Tip 5: Aim for consistency
While you probably don't want every food photo to look the same, it's also a good idea to avoid wide variation in the overall look of your dishes. For a brand to be memorable, a certain visual consistency is essential. Over time, customers will begin to associate your restaurant with a particular aesthetic. Also, in each photo, the meal should appear as approximately the same size as the others.
Another good way to establish a consistent look and feel is to take all of your restaurant menu pics at the same time of day, in the same type of light. This will help the overall balance of light to appear consistent. Choose one or two colors or patterns for your dishware to set the overall look. If you show flowers, for example, place them in similar containers, like glass bottles of the same size.
Tip 6: Make final post-production tweaks
We don't recommend a lot of editing for your menu photos — a natural look is ideal — but a few minor alterations will add a polished appearance and help you put your best foot forward with menu photography. If you are taking pictures with a smartphone or tablet, the editing features that come with the operating system (OS) will usually have the features you need. Of course, there are thousands of other editing options to choose from. Starting with the basics, you can crop, rotate, and straighten your photos to help them achieve a balanced and consistent look.
Next, consider playing around with exposure and lighting. Increasing the contrast of your photos will help them stand out on your menu. Modifying color balance — adding warmer tones and an increased color saturation — can also make a big difference. It's amazing how a few post-production edits can save a menu photo from less than ideal lighting conditions. Check out our photo terms glossary for more menu photo editing tips.
Bonus Tip: Use your menu photography everywhere
After you've invested the time in putting together a gorgeous collection of menu photos, you can use them to promote your restaurant across your platforms — website, social media accounts, emails, partner platforms like DoorDash, Google My Business, Yelp, etc. Your menu photos will be a key component of your marketing toolkit for years to come.
Need more help? Request a free, professional photoshoot
As any professional photographer will tell you, photographing food is an art — and if you'd prefer to leave it to the pros, DoorDash offers a free professional menu photoshoot*.
You get up to 20 mouthwatering photos of your menu items and a header shot of your store to make your store page pop. The only cost to your business is the food itself. For these photos, we suggest you prioritize your most popular dishes.
With this service, you use these photos on DoorDash, your website, social media accounts, and promotional materials. You cannot use the photos on any other third-party delivery platforms.
For those on the Premier pricing plan, you’ll also get a $200 credit that can be used to cover additional costs like food or styling, meaning you can take advantage of this professional photoshoot at no additional cost to your business.
Once you get your photos, it's easy to quickly upload them to your DoorDash menu when you sign up for DoorDash, or in the Merchant Portal or Business Manager App.